
How To Guides
If you are looking for what wallpaper symbols mean, we have created a guide here
Or if you want to know the difference between paste the wall & paste the paper wallpaper paste here is another guide here
In our step-by-step guides, we will show you:
- The tools to use when you apply your wallpaper
- How to prepare your wall
- How to hang the paper
- How to hang wallpaper without the seams showing
- How to cut wallpaper
- How to hang patterned wallpaper
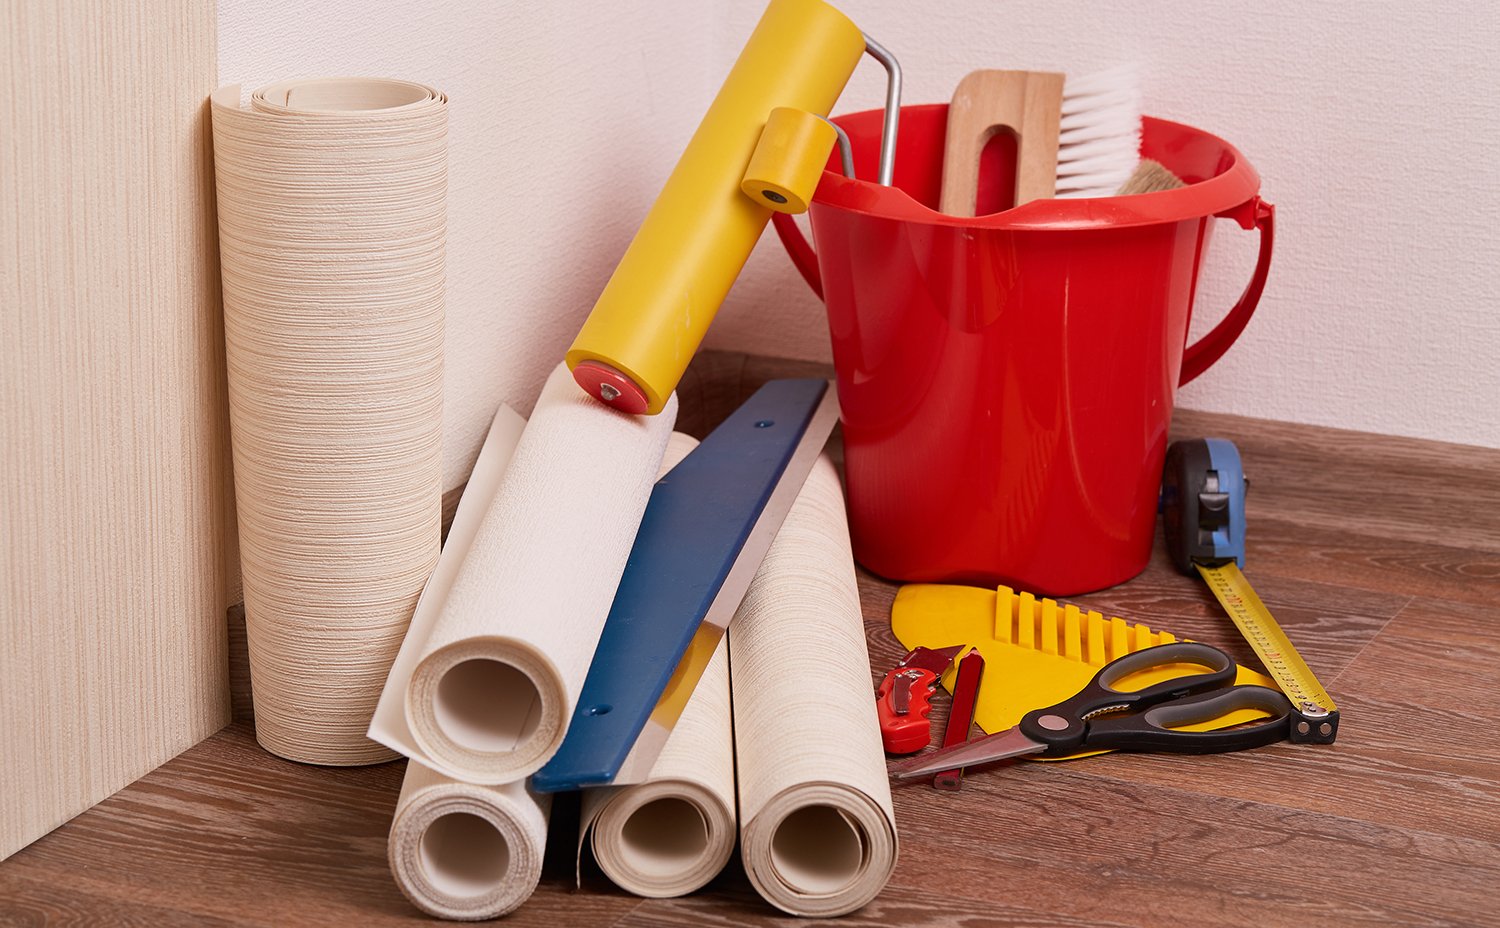
To start with you will need the correct wallpaper tools.
- Wallpaper paste brush
- Spirit level or plumb line
- Sharp decorators’ scissors
- Bucket of water
- Clean sponge
- Pencil
- Pasting table
- Tape measure
- Smoother brush
- Sanding paper/block
- Scraper
- Seam roller
- Sharp Stanley knife.
Once you have all of the correct tools for the job you can then prepare your wall ready for application.
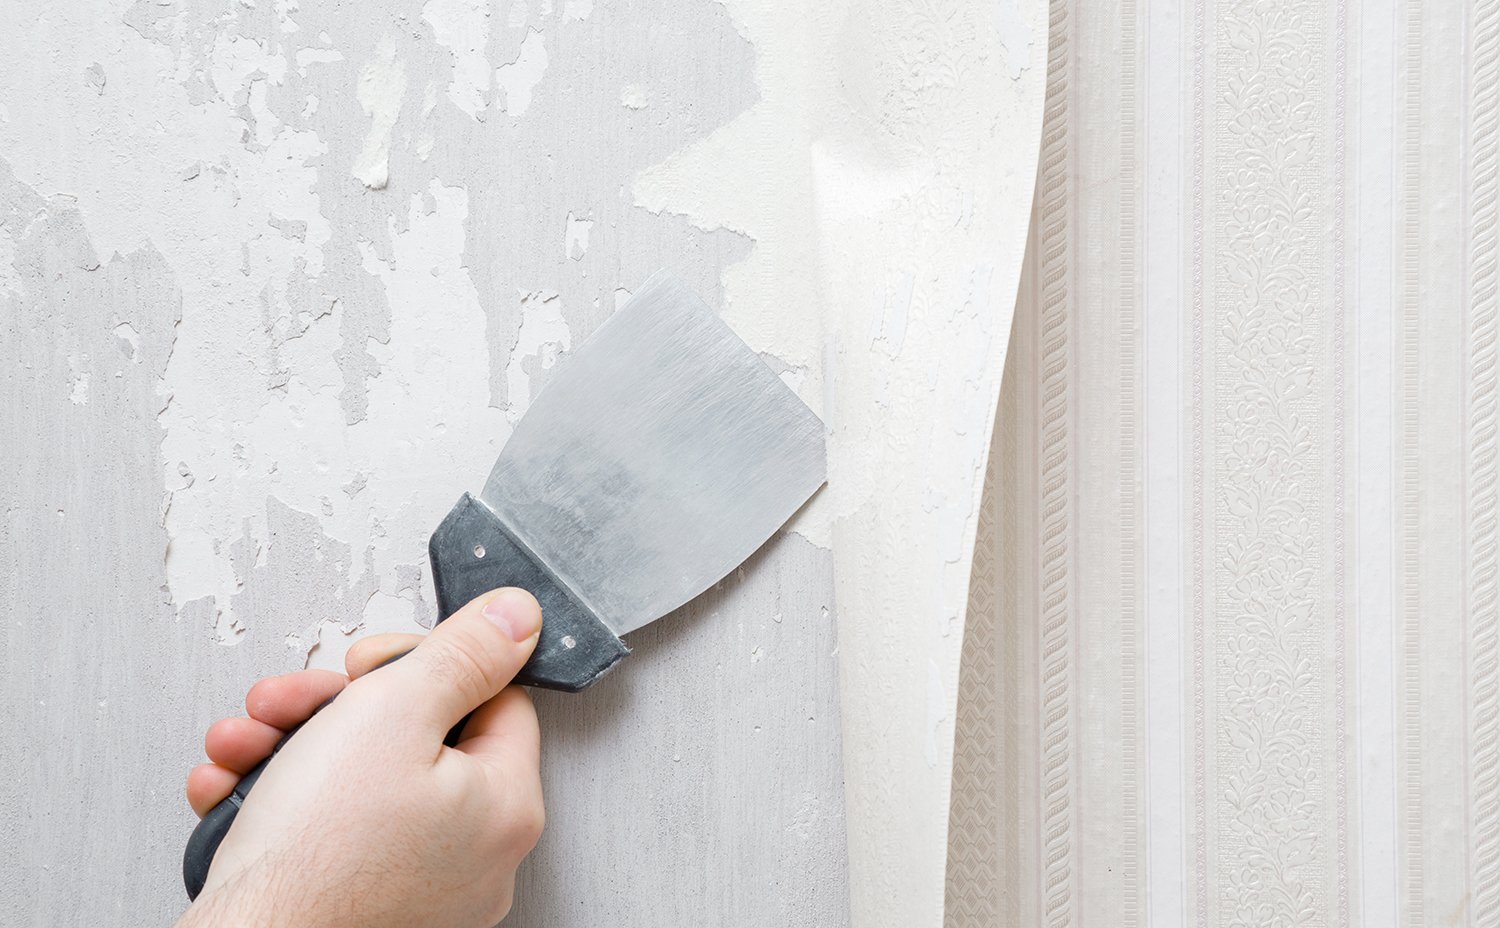
How to prepare your wall:
- Remove any old wallpaper with a scraper or steamer. Painted walls should be roughened with sandpaper.
- Fill in and smooth out any imperfections.
- Wash the wall.
- Absorbent surfaces such as newly plastered walls should be primed, sealed and fully dried out before applying any new wallpaper.
- Wash the wall again.
- Apply lining paper if required.
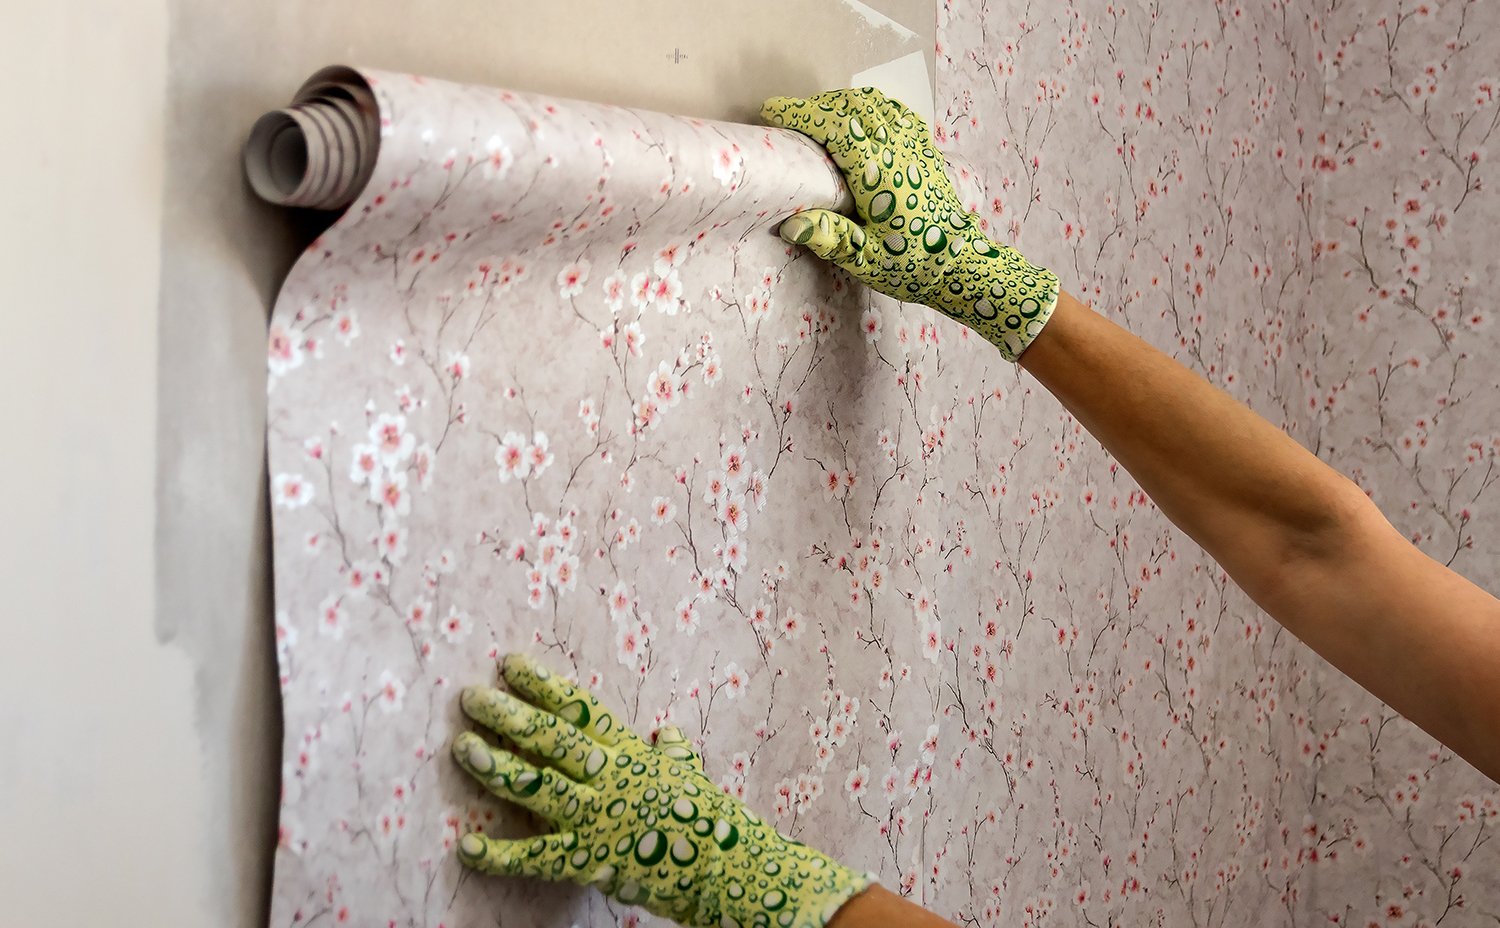
How to hang the wallpaper:
IMPORTANT! Before you commence with any decorating, you must first check that the pattern and batch numbers match for each subsequent roll that is being hung. If you find any irregularities during this inspection then please contact us right away.
Now you have all your tools to use to hang your wallpaper and have carried out the correct steps for preparing your walls, here is a simple step-by-step guide on how to hang the wallpaper.
- Prepare your wallpaper paste as per the manufacturer's instructions.
- Cut your wallpaper to size leaving a margin of a few centimetres.
- Use a spirit level to ensure the position of the first piece of wallpaper.
- Generously paste the paper or the wall depending on what type of wallpaper you are using. Avoid getting any paste on the patterned side as it can ruin the wallpaper.
- Line the wallpaper up where you have marked the first position.
- Trim the top and bottom wallpaper edges.
- Match the pattern up with the second piece of wallpaper by sliding it together.
- Carefully wipe off any excess paste with a sponge and water.
- Use a wallpaper smoother and seam roller to apply the finishing touches.
How to wallpaper corners:
1. Paste the wall as before into the corner and a little way around.
2. Match the left edge as previously and brush the wallpaper into the corner and around it. There is a good chance the corner will not be perfectly vertical. You will only need to go around the corner with the paper by approximately 2-3 cm or until the wall is vertical again.
3. Remember, when you started your first drop, you hung the first piece 50cm out from the corner? Do the same here – or match up to that line – overlap the paper. This means in the corner, the paper will overlap. This is ok – and could be left to dry, but for a professional finish, you should take an extremely sharp/fresh blade and, using a steel straight edge, cut the papers where they overlap.
4. Remove the excess off the top paper, then peel the top paper back and remove the excess from the bottom paper.
5. Now push the top paper down – it should match and meet perfectly with the bottom paper and join like two seams of wallpaper. This is the reason to do it in a corner, so any potential mismatches do not show.
6. Internal corners will depend on the room. If you’re lucky, you may not have more than one or two internal corners to tackle. But if you live in an older property with lots of nooks and crannies, you may have several internal corners. Take your time, don't rush the job, and go through each step methodically to get a perfect result.
Although it might be tempting to wallpaper around the radiator first, it's best to work your way around the room to avoid wasting full strips of wallpaper.
To wallpaper around the radiator, first check the type of bracket holding it in place. If possible, remove the radiator and wallpaper straight down. If not, you'll need to paper around it.
- Measure the strip of wallpaper as though the radiator isn’t there, cutting it slightly longer than the other strips.
- Cut the wallpaper diagonally into the corners to help place it behind the radiator.
- Paste the wallpaper and stick it in place, matching it to the previous strip on the wall.
- Add an additional piece underneath the radiator to complete that section.
- Remove any excess paste with a dry cloth before it dries, and smooth the wallpaper to eliminate air bubbles.
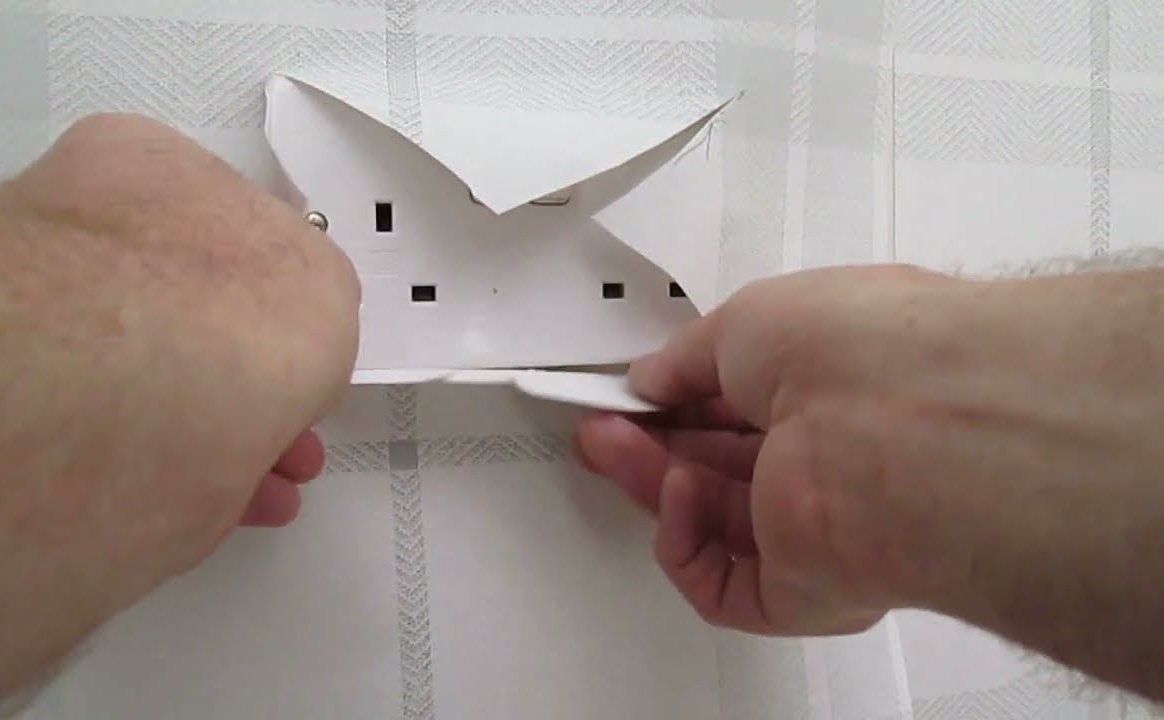
How to wallpaper around sockets:
Not every wall is perfectly smooth, and you'll likely face challenges like light sockets, switches, corners, and fireplaces. Here are some easy techniques for a professional finish, starting with light sockets and switches.
- IMPORTANT-Turn off the mains power before starting.
- Unscrew the socket and pull it away from the wall slightly.
- Paste the wall and smooth the wallpaper into place.
- When the wallpaper reaches the socket, hang the paper over it. Mark the four corners of the socket on the paper and score an "X" diagonally, taking care not to damage the faceplate.
- Cut along the "X" lines and peel back the paper to reveal the socket.
- Cut down the four triangles formed at the edges, push the excess paper behind the socket, and screw the socket back down for a seamless finish.
How to wallpaper around windows:
- Hang the wallpaper above the window, allowing it to overhang the window recess. Smooth it down, stopping several inches above the window recess.
- Make a horizontal cut just above the edge of the window reveal.
- Make a similar cut near the bottom, just below the window sill. Fold the paper around to cover the side of the reveal.
- Smooth the paper onto the reveal using a smoothing tool or brush.
- Trim off the excess paper with a utility knife and a suitable guide.
- Cut and fit the next piece of wallpaper to fill the overhang and the wall above it. Fit another strip to cover the wall directly below the window.
- When you reach the opposite side of the window, fit the wallpaper around the window reveal, following steps 1-5.
- For the upper corners of the window overhang, match the pattern with an off-cut piece of wallpaper, then measure and cut it, adding an extra 20mm at each end for fitting and trimming.
- Overlap the new piece onto the existing wallpaper above the window, matching the pattern. Make a double cut through both layers, remove the underlying layer, and fix the new strip in place. Fold it around the overhang and trim the excess.
- Repeat this process for any additional areas of the overhang that need wallpaper.
Air bubbles and wallpaper can be an annoying combination. But here at Wallpapershop.co.uk we know how to remove air bubbles from wallpaper.
- Most bubbles are simply caused by air being trapped underneath the wallpaper.
- Use a wallpaper smoother, decorator’s brush to push the air bubble from the centre to the edge.
- Take care not to crease the paper
It is extremely important to carry out the following checks before cutting the goods or using them in any way. It is also extremely important to read the hanging instructions on the manufacturer's label before you commence with the job.
You must check your wallpaper upon arrival to ensure there are no defects. If you have any issues or queries then please contact us directly.
Are you working in good lighting, cleanliness and temperature conditions? YES/NO
Are you sure that the goods are as ordered and are free of faults? YES/NO
(Your wallpaper must be the same pattern number, batch, colour & design to match up)
Do you have the correct hanging instructions and are you using the correct adhesive? YES/NO
(We recommend Ready-Mixed Paste for non-pasted paper - be sure not to overwork your paper which can cause stretching)
Does the pattern repeat on the label match with what you were expecting? YES/NO
Are the walls prepared correctly to ensure they are smooth and free from marks? YES/NO
(Preparation may need to include lining your walls.)
After hanging 3 LENGTHS of paper, is the result completely satisfactory? YES/NO
If you have answered NO to any of the above checks or if you have any doubts, please do not proceed with the job. Please contact support@wallpapershop.co.uk immediately before continuing.
When hanging a new roll of wallpaper, inspect after hanging 3 lengths. The decision to continue applying is then the decision of yourself or the decorator. We can not be held liable for consequential loss in respect of defects apparent prior to hanging.
Please note some papers are reverse rolled due to production methods, the way the paper comes off the roll is not necessarily the way it should be hung, please ensure you check before hanging.